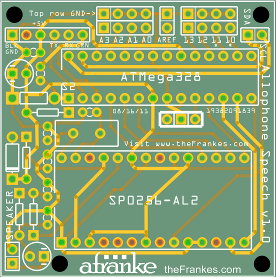
Here’s an Arduino-compatible GI-SP0256-AL2 speech synthesizer module that I’m finishing up. It’s a great 1980’s-era allophone speech synthesizer chip that was used in Intellivision expansion modules and sold at RadioShack stores for years for about $12. You can still find them from time to time on ebay, and they produce a fantastic synthesized speech sound. The chip is sometimes called the “SPO256-AL2” (with the letter “O” as opposed to the numeral “0”) due to a typo in the original documentation from RadioShack.
First, here’s a video of the speech synthesizer in action:
The chip works by sending it a series of allophones (59 to choose from) that make up all the sounds of the English language. It’s a real rats nest when wired up on a breadboard, so I thought I’d throw it together on a little 5cm circuit board. (Let me know by commenting below if you’re interested in one.)
The board leaves open (and accessible) four analog pins and four digital pins (two with PWM), plus two additional analog pins in you use the serial clock and data lines that are set up for I2C communication by default. The eight non-I2C pins are paired with ground pins, and three are set up by default to configure the device address for I2C communication. It requires regulated 5V via a standard 6-pin FTDI connection (you don’t need to use all pins unless you’re programming it), and there’s an output jumper at the bottom that can be amplified to power a speaker.
Here’s the design. It’s about 2 inches square. I’ll post the code when I get it finished up. Let me know if you’re interested!

Arduino-compatible SP0256-AL2 Speech Synthesizer
Some Code
Here’s some of the code I used for my test. I’ve updated the code on Februay 18, 2012 to include the required loop() method (which I’d accidentally left out) and to rename the “SS” constant so it doesn’t conflict with the Slave Select constant in case that’s defined.
1 2 3 4 5 6 7 8 9 10 11 12 13 14 15 16 17 18 19 20 21 22 23 24 25 26 27 28 29 30 31 32 33 34 35 36 37 38 39 40 41 42 43 44 45 46 47 48 49 50 51 52 | // Voice Pins -- The SP0256 address pins are all on the same port here.// This isn't necessary but it does make it a lot easier to pick an// allophone in code using PORTC in this case.#define PIN_A1 A0#define PIN_A2 A1#define PIN_A3 A2#define PIN_A4 A3#define PIN_A5 A4#define PIN_A6 A5#define PIN_ALD 2#define PIN_LRQ 12// some words to saybyte purple[] = {PP, ER1, PP, LL };byte monkey[] = {MM, AX, NN1, KK1, IY };byte garden[] = {GG1, AR, PA3, DD2, IH, NN1 };byte moment[] = {MM, OW, MM, EH, NN1, TT2 };void setup() { // Set pin modes pinMode( PIN_ALD, OUTPUT ); pinMode( PIN_LRQ, INPUT ); DDRC = B00111111; // Sets Analog pins 0-5 to output digitalWrite(PIN_ALD, HIGH); speak( purple, (byte)(sizeof(purple) / sizeof(byte)) ); speak( monkey, (byte)(sizeof(monkey) / sizeof(byte)) ); speak( garden, (byte)(sizeof(garden) / sizeof(byte)) ); speak( moment, (byte)(sizeof(moment) / sizeof(byte)) );}void loop() {}void speak( byte* allophones, byte count ) { for( byte b = 0; b < count; b++ ) { speak( allophones[b] ); } speak( PA4 ); // short pause after each word}void speak( byte allophone ) { while ( digitalRead(PIN_LRQ) == HIGH ) ; // Wait for LRQ to go low PORTC = allophone; // select the allophone // Tell it to speak by toggling ALD digitalWrite(PIN_ALD, LOW); digitalWrite(PIN_ALD, HIGH);} |
Allophones
Here are the allophone definitions:
1 2 3 4 5 6 7 8 9 10 11 12 13 14 15 16 17 18 19 20 21 22 23 24 25 26 27 28 29 30 31 32 33 34 35 36 37 38 39 40 41 42 43 44 45 46 47 48 49 50 51 52 53 54 55 56 57 58 59 60 61 62 63 64 65 | #define PA1 0x00#define PA2 0x01#define PA3 0x02#define PA4 0x03#define PA5 0x04#define OY 0x05#define AY 0x06#define EH 0x07#define KK3 0x08#define PP 0x09#define JH 0x0A#define NN1 0x0B#define IH 0x0C#define TT2 0x0D#define RR1 0x0E#define AX 0x0F#define MM 0x10#define TT1 0x11#define DH1 0x12#define IY 0x13#define EY 0x14#define DD1 0x15#define UW1 0x16#define AO 0x17#define AA 0x18#define YY2 0x19#define AE 0x1A#define HH1 0x1B#define BB1 0x1C#define TH 0x1D#define UH 0x1E#define UW2 0x1F#define AW 0x20#define DD2 0x21#define GG3 0x22#define VV 0x23#define GG1 0x24#define SH 0x25#define ZH 0x26#define RR2 0x27#define FF 0x28#define KK2 0x29#define KK1 0x2A#define ZZ 0x2B#define NG 0x2C#define LL 0x2D#define WW 0x2E#define XR 0x2F#define WH 0x30#define YY1 0x31#define CH 0x32#define ER1 0x33#define ER2 0x34#define OW 0x35#define DH2 0x36#define SSS 0x37#define NN2 0x38#define HH2 0x39#define OR 0x3A#define AR 0x3B#define YR 0x3C#define GG2 0x3D#define EL 0x3E#define BB2 0x3F |
Tags: arduino, electronics, geek, programming, robot
-

Hi there
I am also playing with an old SP0256
I would love to see your code
can you post it ?
many thanks


27 comments
Comments feed for this article
Trackback link: http://www.thefrankes.com/wp/wp-trackback.php?p=2490